Tuesday, November 27, 2012


Well, as you know I love some Anthropology creativeness.  A few months ago, I was enjoying a look/see in our local Anthropologie store.  Their creations never cease to WOW!    And yes, please, I want one of e.v.e.r.t.h.i.n.g!   But... as much as I love their dreamy products, I have so much fun checking out their window fronts and other displays.   I will go so far to say that in my next life, that is my dream job! 
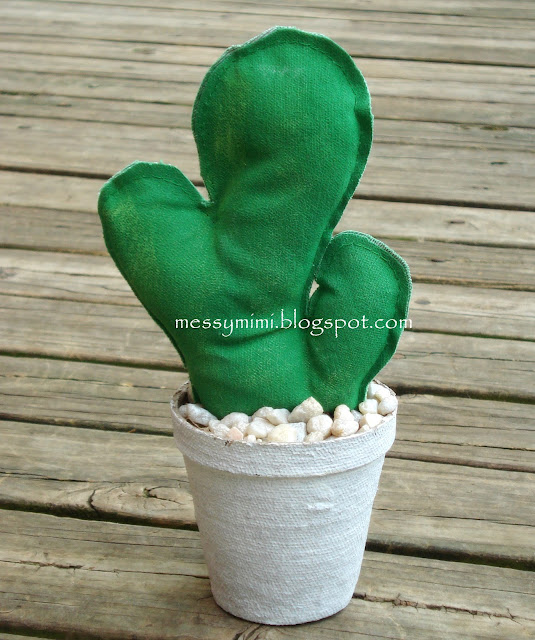
I was inspired by their fabric cactus.  Here is my small effort!
\
After washing my dropcloth I watered down some Leaf Green Acrylic and painted it.  Added a few other green paints with dry brush to give it a little more depth.
Made a pattern out of an old cereal box.  Folded the fabric over (painted sides facing) and traced the pattern with chalk.  Cut it out - ending up with 2 pieces.

stitched them together with right sides facing out.  Sort of the opposite of what you would normally do.......
a little gesso on some peat pots.  (Any of you that have followed this far - well thanks for being here!  You are so special and I hope you will leave a comment so I can follow you too - if I'm not already following you!)
Okay - back to the next step.......I've had this project stuck in my head ever since I saw the fabric cacti all over our Anthropologie store.  How to put this all together?  I decided to reuse paper grocery bags.  Cut it into strips, crush them up and use them to support my fabric cactus. 
Cute - but I also tried topping it off with some pebble stones leftover from another project
Love it either way!   
Thanks so much for being here!!

New (Trouble with Trouble) drop cloth pillow!

Finally finished my newest pillow with one of my favorite quotes!   


This pillow is made of drop cloth that I pre-washed   Then created a mirror print on our laser printer at the office.  (You can do this by going to Advanced Properties with most laser printers.)   I do have one stubborn one at the office that won't let me do this.  Grrrr  If your printer doesn't let you mirror the image there are a few other options.  Let me know - I would love to help if I can.

Taped it to the center of pillow and dabbed some Citra Solv with a cotton ball.  If you don't already know the drill check out this tutorial from Lil Boo Blue.  Or Google for many more :)  It's a great technique but, I found that putting the Citra Solv (CS) on the print in a small area, rubbing hard with the back and side of the spoon, check to see if it worked then, move to the next few words rubbing lightly with the CitraSolv cotton ball as you go worked best for me.  It gives the print a nice worn look.  

And, you know it is so true..........trouble does start out as fun :)


Saturday, July 7, 2012

Geeking up some coasters and helping reduce e-waste!

I never knew - never had a CLUE what wonderful equipment was sitting right under my nose at our family manufacturing plant until I started blogging in November 2010.  All sorts of saws, metal equipment painting booth silk screening area and so much more.   Plus vintage metal desks and chairs (like my Red Rooster Drafting stool) and shelving just screaming for new life in gorgeous colors!  (Oh, how I wish there were more hours in my day!)
For a quick indoor project (yes, we are also having record highs in the 100s and Code Orange air all week like so many of you)  I grabbed some old circuit boards and glued some thin cork on the bottom. These are 3-3/4" x 3-3/8" in size. 
Turned them over and coated them with acrylic sealer to waterproof them, then tied them up with some twine laying around.  This is a gift for one of my sweet geeky friends!
And just in case you didn't already know, e-waste (electronic waste) is a very fast growing waste problem for the earth   (But, I bet you already knew that!)  We have hundreds of obsolete circuit boards at our company alone.  So, look for more circuit board projects, both large and small, to be posted soon!  
Happy rest of the weekend!

Wednesday, June 27, 2012

Clear Chalkboard Paint

It's no secret that I LOVE using chalkboard paint whenever I can.  So, a few months ago I wondered if you could add calcium or un-sanded grout to something like clear polyacrylic sealer and use it over regular paint to create a chalkboard.  Well, it only took me several months to get back to that idea. 

 I started with what I already had - some Polycrylic and powdered calcium 
 The "guinea pig" for this project was a tray I bought at Goodwill and sprayed with some leftover Rustoleum Oil Rubbed Bronze paint.  Still playing around with the ratios - I started with the same ratio as if I were using regular paint but it was way too thin.  I kept adding calcium powder to thicken it up.  So far, I'm pleased with the project.  I'll share the final ratio soon - It's looking like 1 part calcium powder to 3 parts poly is best.   
(And LOL - I don't mean to try to get all scientific here)  


Sunday, June 24, 2012

Project fail - But I Learned Something New!

The other week, I got a crazy random idea.  It all started when I saw this little can of Copper Metallic spray paint. 
 I have been loving the mercury glass projects I keep seeing everywhere and so......my random side kicked in and I wondered if I could create the same finish with copper?
Well.....yes and no.  I sprayed the copper metallic paint inside my glass vessel.  Then sprayed the white vinegar/water solution (1:1) on the paint.   My first try you see on the left.   Didn't work so well for me.  For my second try I sprayed the vinegar solution first then used the copper metallic spray over that.  Let it dry a bit and used a cloth to gently remove spots to try to create the same mercury glass look with the copper  I wasn't really happy with either result so I gave up and moved on to other projects.  
I was hoping to make an awesome candle votive and maybe I will at some point  But, as I said, it didn't turn out the way I planned it in my head.  And that's okay.

But, in the meantime, I left the paper towel with the vinegar solution in the bottom of the first glass.  For about a week.   What a pleasant surprise to see the copper patina at the base of the first glass!  Simply because I forgot to toss out the vinegar paper towel!   So, I learned something and maybe, just maybe, it will lead to some new interesting creations.  Maybe.  And just maybe it will inspire some of you!


Thursday, May 17, 2012

Colorful Wooden Tool Boxes with a Little bit Of Chalkboard Paint!

So..... a while back I posted about an old tool box that I made "pretty" by girling it up   Fast forward to NOW and I am making my own and painting them whatever pretty color my heart desires!  And woo hoo I have actually sold a few!  Now, that's a good thing.  Bad thing is I have put most of my tool trugs to use for me.  
One of my favorites that I obviously couldn't keep because my name is not Donna
next up is the turquoise I love
Added some red chalkboard paint
Testing new colors and color combinations.  Maybe even a little paint dipping that is all the rage now :)
not a great picture but the green (Benjaman Moore Paradise Valley with blue chalkboard paint is my favorite so far)  And stay tuned - I am trying some new ideas for the next tool box (yellow and turquoise are together one of my favorite combinations!)   And glitter will be involved :)

MONDAY
Skip to my Lou-Made by You Mondays
Keeping it Simple - Motivate Me Monday
The DIY Showoff - DIY Project Parade
Polly Want a Crafter Party Mondays 
Lines Across My Face - Cure for the Common Monday
The Girl Creative - Just Something I whipped Up
DIY Home Sweet Home Project -  More the Merrier Monday
Molly Susan Strong - Market Monday
Making the World Cuter-Making the World Cuter Monday
Embellishing Life - Craft Catwalk
Homemaker on a Dime  Creative Bloggers Party and Hop
Creating my way to Success - A Round Tuit
Dittle Dattle - Amaze Me Monday

Tuesday, May 15, 2012

Happy Tuesday!


Just had to share a picture of the sweetest dogs in my life!  Jack has the guilty look but that small Morkie, Zozo, is a little rascal!  


Tuesday, April 24, 2012

Creating Chalkboard Cabinet Doors from Habitat Restore

Our local Habitat Restore has stockpiles of new and used cabinet doors priced at $1 each.  Yep - one buck!  So, now, I have a little stockpile of my own....
Here is an example of new ones.  I started by sanding, then priming, so the paint (Benjamin Moore Paradise Valley) would not chip so easily.  Then, using my Purdy XL cub brush, I painted the center with chalkboard paint.  I adore this brush - I didn't use any painter's tape!  Who doesn't love a good shortcut???
Then, I used one of my new favorite machines I just discovered at our plant to drill holes for the knobs.  A very old but amazing drill press!  You will be seeing more work with this baby.  It has made my life so much easier!  It can hold just about any drill bit I want to use - and drills it straight!  Oh - I think I'm in love :)
Added these knobs I found at half price from Hobby Lobby - they were $1.50 each.  Now, a peek at some of my projects with the cabinet doors I have been accumulating.  (That's a nicer word than hoarding maybe?)
Lots of Works In Progress going on around here.  Hope to share more soon!
As always, I am so thankful you stopped by!  


Wednesday, February 8, 2012

Big Bright Blue Shutter Jewelry Holder!

Once upon a time, I found some old shutters at Habitat Restore.  (For real, it was around May of last year)  I had so much fun with my first project, my old pink shutter, that whenever I find shutters anywhere I grab them!   Here you see this shutter looking so lonely and bare on the old shower curtain I use for painting in the backyard.  
Here is the paint to give it a new life!  This is my youngest daughter's favorite color and, how convenient, that it comes in a spray can?
I sanded the shutters a bit then sprayed the paint right on - no priming, or any other prep work.  Sweet!  Added some knobs and drawer pulls I also bought at Restore - they were $1 each.  Here is my favorite one.  I think it would be so cute on a little boys dresser or maybe even whitewashed or glazed or painted!
Well, here it sits by the back door ready to get loaded into the car with tons of other stuff and travel with Julia to her college apartment.  I wish I had a picture to share of it with her jewelry because it looks really great.  She was sweet to send her Mom a picture but Mom lost it somewhere in her computer.    
I will get another one and add it soon!  
She has earrings hooked over the shutter slats and necklaces/bracelets on the knobs and handles.   The upside down pull holds her earring studs.  And she has pictures tucked into the slats.  Oh - I hope to share a picture soon!
And her friends loved it so much that I have made 3 more jewelry organizers (and they are not all shutters)   I hope to share those soon!

until next time!    
  

Monday, February 6, 2012

Finally finished my Dog Pillow!

I have been promising my daughter, Kathleen, that I would make her sweet Morkie a pretty pillow.  That was, ummm, about 6 months ago.    Today, I finally made it.  I'm one of those that needs the fabric to "talk" to me for inspiration.  And, I just bet, a lot of you understand!  
So, I found my inspiration fabric at Hobby Lobby last week.  It's a colorful paisley mixed with flowers on a black background.  I love this fabric.  Sad to say, I didn't write down the name of the fabric pattern and, when I went back to JoAnns, it was not there.  They sold out of it fast.   Well, live and learn....seems to be my theme lately.
Back to the pillow.  I wanted it to fit a standard pillow which is usually 20 x 28 inches.  I like to make my pillows a little smaller than any insert I will use - makes it a little more plumpy  (is that a word?)   It was originally going to be an envelope pillow but I decided, at the last minute, to experiment with an invisible zipper.  
This is my attempt and I tried to follow the manufacturer's instructions.  But, I gave up and sort of winged it.   Pinned the right side of one zipper side to the right side of the fabric.  Used my zipper foot to stitch as close as possible to the zipper teeth.
Pinned the other zipper half the same way (right side to right side)  and stitched again.  
 Okay, not too bad a job.
Now for the fun part... final construction of the doggie pillow!
Pin the right sides together and stitch all around.  FYI - I always forget to unzip before I finish the last side so I have to creatively find a way to unzip the pillow so I can turn it right side out.  
Insert pillow and I am finished!  Maybe.  I think I want to round out the corners...
and love this quilted dog bed!
Ohh - one last thing.  This is the next dog bed/pillow I want to make.  Love it!
By Leah Anderson


until next time!

LinkWithin

Related Posts Plugin for WordPress, Blogger...
Pin It button on image hover