Wednesday, March 9, 2011

Two Burlap Shamrock Pillows

Hey all!
Here I go again with what I love.  Pillows and really easy quick ones to make. And burlap!  Duh.
Here are two Shamrock pillows that are small in size.  This is what I started with for my Shamrock pillows - they are so quick and easy!  {Can't get much better than that - Ya think?}


What I used:
Lion Brand Homespun Yarn {from one of the craft stores}
Green and cream colored Burlap from Hobby Lobby
Cream colored muslin I had {thinking from Hobby Lobby also}
Green DMC embroidery thread same color as yarn
A shamrock pattern
And polyester stuffing!

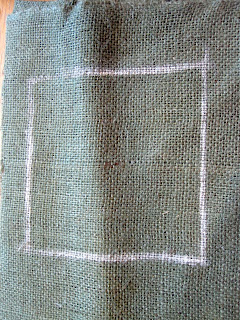
The cream colored burlap pillow was inspired by the Pottery Barn knock off pillow posted on The Scrap ShoppeI   Her pillows are amazing!  Here is my little attempt.  I wanted a small {8 x 8 inch} pillow so I cut out two 9 x 9 inch burlap squares.   I sketched out a Shamrock on one square Then, using my trusty Liquid Stitch, I started gluing along the outer lines of my Shamrock.  


Kept going all around and around until I filled in the Shamrock.  This was so easy and fast!  Ha!
{Hint - since burlap is such an open weave I put wax paper under the fabric so it wouldn't adhere its cute little self to my kitchen  craft table!  


Let it dry then sew the two burlap pieces together . And - like you all know - left a 2 inch opening to turn the pillow right side out, stuff the rascal, then sew it shut!

You will see the end result along with my lucky pillow soon - Promise!
For the other {green burlap} pillow this is how it goes:

Cut out two 6 x 6 inch squares of the Forest Green burlap.  {Ugh - I could not get a true picture of the green burlap.  Sometimes it just ain't happening!}


On a small piece of off muslin {1 -3/4" x 3"}  I stitched "happy" in a very primitive way  (meaning I haven't done this in many moons and it wasn't going to be pretty}  And, like I usually do, I cheated and ironed fusion on the back of this cutie pie and then ironed it straight onto the pillow.  {again - putting wax paper between the layers so they wouldn't stick to each other.  That would be sooooo annoying!}


Here we are all sewn, stitched,  and ironed onto the small pillow!


I wanted to give it a little more finished look that didn't show how I cheated gluing instead of stitching   so I hand stitched around the muslin piece.  Started out with a blanket stitch but WHOA - way too much stitching!  Still think I will do it different next time.  But, love my lucky pillows and here's hoping they will bring luck my way!   {I promise to pass it along to YOU if they do!}


My newest babies!
Wishing you and yours, Irish or not, a great St. Patrick's Day!


Linking to these Fabulous Parties!

Thursday, March 3, 2011

Leftover Chalkboard Paint - what to do?


I still have some of the Turquoise chalkboard paint and have two more posts!  {Are you tired of me yet?}  That one cup of chalkboard paint is really making the rounds.  I love the color - it reminds me of spring, summer, and the beach!  Oh soooo ready here!


Okay - back to business. In this project I used one of the wooden plaques I found on sale at Hobby Lobby for 69 cents each.  Didn't know what I would do with them but  I  had $3   knew they deserved a better life than being buried in the bargain bin!  


As usual,  I work in the moment.  That's what I love about creating - the process!  So, as I get caught up in the process sometimes I forget to take pictures and sometimes I remember.  I challenged myself in my next post to be totally uncontrollably and laboriously taking photos of every step!  Talk about that later but warning!  It could will most likely be painful........


As you remember this is what I started with for the paint for my many projects.  I used the formula  from Martha Stewart


Used one cup acrylic paint {the 8 oz botttle} with 2 Tablespoons of the non sanded grout   I painted 3 coats {sanding with fine paper after each coat  Yea - supposed to do that but I love shortcuts and didn't find the need to sand after each coat.  Once is just fine!  


Here is a real blurry pic of how to rub the side of chalk all over the painted board - to "cure" it.  Like you needed me to show you how!  But just in case - after you rub the chalk all over your new chalkboard you can use a damp cloth, clean it off and you are ready to go!  I like to do this at least 2 times.  


I chalked this board {with my Grandmother's name} and used some of the stash of sisal rope I bought for the last project.  Put it beside the wooden angel that looks like my sweet 92 year old Mom.  {My kids call her Moop}  My oldest son loved it so much  {cause he loves her so much!} so she gave it to him.  I am extremely thankful I took the picture with the doll because............ somehow it fell on the floor and my precious sweet but  Oh Yea WHAT A MONSTER puppy with JAWS snagged it.  


Lots of tears that night - but one thing this dog that somehow - tell me WHY - I still love? - has taught me:

Life is fleeting - you could lose anything anywhere in the blink of an eye {like my wooden angel} 

So enjoy!  Enjoy anything and everything you can.   Until next post........


Linking to these lovely Parties.  Please check them out - you will be so happy you did!  They are wonderful!

Be sure to check out this great party going on now through April 30th!


The DIY Show Off

Tuesday, March 1, 2011

More Chalkboard Paint Projects


Thanks for visiting today!  I have been working with some chalkboard paint again and have a few projects {some finished, some not quite yet}.  Back in January I posted a project making my own chalkboard paint picture frames using this recipe from Martha Stewart.  {View the recipe here}  
I love making chalkboard paint in colors!  This time I wanted to use a more ‘spring like” color so I bought an 8 oz. Bottle of Turquoise acrylic paint.  Poured all the paint into a plastic container and added the 2 tablespoons of unsanded grout.


I wanted to make a chalkboard to help keep up with the week’s activities.  Really, you could use it anyway you like.  Bought a 2 x 2  foot Masonite board at Home Depot and let the kind gentleman there cut it in half ending up with 2 boards 1 x 2 feet each.  I decided to hang the board vertically so on one of the one foot sides I drilled a hole in each corner of the board. 


Then, I painted about 3 or 4 coats with the chalkboard paint.  {I’m not sure because I had to paint in between other projects, family, dogs, and laundry – like most of us – and I forgot to keep count!}  After drying, I sanded it with fine sandpaper.  I finished it by rubbing the side of a piece of chalk all over it and wiping with a slightly damp paper towel.  I did this twice.  Shown here is rubbing chalk over another project coming soon!


I used a ¼” sisal rope to hang it.  Just threaded it through the holes and tied a knot.  Then it’s ready to go!  Write whatever suits your fancy and enjoy!  This is what I thought was a finished board - you know how projects sometimes "evolve"  
Can you tell how impatient  artistic I was?  Well, when I ran into this little Starfish in one of the craft stores  {I get dizzy trying to remember which one where I saw what cute thing when I was where?}  I decided it was going on my beachy chalkboard!}   I added my Starfish but , as you well know, you can add anything you want - no rules here!  As long as it makes your heart SING and puts a BIG smile on your face.  :)
FYI, I stored the paint in a recycled large yogurt container for more projects like this one-a
small wooden container I bought for $1.00 at one of the craft stores.
and this one that I used some more of my sisal rope 


and then I had enough left to work on glass!

then one last fling - still a  little paint leftover but sooooo ready to move on to new stuff!!!

But not until one last whoop whoop hurrah! for my favorite color chalkboard paint!  {More colors to come -promise!}


Here's the next board!  Purple!


Linking to these wonderful parties!  Show them some love because they are extra special!  Doesn't get any better than these guys!


Domestically Speaking- The Best
At the Picket Fence - Inspiration Friday 
Skip to my Lou -Made by You Mondays
Tatertots & Jello - Weekend Wrap Up
Blue Cricket Design Show and Tell Wednesday
French Country Cottage - Feathered Nest Fridays
The Shabby Chic Cottage - Transformation Thursday
Elements Interiors -  Whassup Wednesday
delicate CONSTRUCTION - Delicately Constructed Fridays
Fireflies and Jellybeans  - Show Your Stuff 
Debbie Doos - Debbie Doos Newbie Party
I heart Naptime - Sundae ScoopTip Junkie at  Tip Me Tuesday
Centsational Girl - All Things Paint
Be Different Act Normal - Show and Tell Saturday
Paisley Passions  - Thrilling Thursdays
Ladybug Blessings - Handmade Tuesdays 
Super Stinky Boys at  Mad Skills Monday  
Domestically Speaking - Power of Paint Party
Sew Chatty - Made With Love
DIY Home Sweet Home Project   -  More the Merrier Monday
Keeping it Simple - Motivate Me Monday
Embellishing Life   - Craft Catwalk
Today's Creative Blog - Get your Craft on
The Thrifty Home - Penny Pinching Party
whipperberry - Friday Flair

Edible Easter Basket Grass

How cool is this?


Easter basket grass your kids can eat!  Hmmmmm....if it is any good could you please make baskets and decorations edible too?   I'm thinking if you did then it would make my life easier!  No need to put up baskets and decorations!  Ha!  And next comes Christmas, Thanksgiving, Valentines, and so on and so on.  

LinkWithin

Related Posts Plugin for WordPress, Blogger...
Pin It button on image hover