Thursday, January 27, 2011

New Burlap Heart Pillow - PINK!

I have another burlap project here!   First, I have to apologize for this lengthy post.  I'm not good at cutting down or packing light.  Please feel free to skim over this because, I just bet you all know how to make this!  But just in case - here we go!  


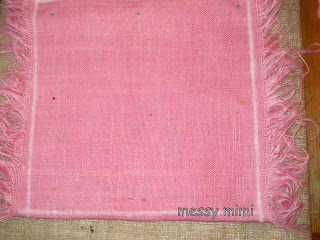
This is something I had been thinking about for a while but needed to get through the holidays first.  I have worked on several burlap projects and got to thinking - wonder if I could dye this stuff and have more color options?   Heck yea!  And I chose PINK for my first attempt.  


I bought the lightest cream-colored burlap I could find.  Don’t know why but I really wanted to do something pink!   Sooo – I decided on RIT Fuchsia dye.  I remember using RIT as a kid {eons ago} and it was so easy.  Still is! 

I followed the RIT instructions for a washing machine.  The longest cycle on my machine was for 12 minutes so I set a timer and before it could drain I would turn the dial back to the 12 minutes.  I did this twice, using cold water.  My husband hooked our machine up and just can’t understand why the hot water doesn’t work.   Duh?  All you lovely ladies out there with handyman husbands – I am so jealous!  Mine is a true “bull in a China shop” but I guess I will keep him!   He's lucky he's cute!


Ok- small problem.  I was a little impatient {surprise there!} and, even though I knew burlap would unravel in the washing machine, I had no idea just how much!  Wow, bet I lost about 5 – 6 inches off the width. {Grrr}  Next time I will loosely stitch the sides   Or try liquid fray check.  {You can see in the picture how much it unraveled}   If you don’t want to mess with that I would highly recommend using a piece at least one fourth wider than the size you want to work with.  Thankfully, my washing machine survived!  

Now – on to the pillow!  Whew – it took a while to get here and I will try to make this as short and sweet as possible!  {Big wink here}


Made 23 of these red burlap rosette puppies.  Yep, these guys get a little hairy looking...... actually really hairy looking.  But hey - that is so part of burlap charm.  {I did trim them up a bit.}  They were a little unruly and I'm so sorry I don't have a pic of that.  Next time.


I wanted a 14 x 14 inch finished pillow so I made a 16 x 16 pattern.  And cut it out!


  Saving this fringe for another project, another day!  Ha!  Always dreaming.......

Took a square piece of paper 8 x 8 inches, folded it in half, sketched out half a heart, then cut it out for my heart pattern.   {Kindergarten skills here guys}  Bingo!  I used this pattern to cut out the red felt  heart I was going to use for the base of my 23 rosette heart.


Arranged the flowers on the heart, and once I liked the way it looked I glued these babies onto the felt heart with Liquid Stitch.   


Since I had a little trouble with the large ric rac on my other pillow, I decided to make my own red burlap piping for this one.  Using a wooden yardstick I measured 2 inch diagonal strips on what was left of my 1/2 yard of red burlap.  These were shorter pieces than I would like because – well – that’s all I had!  


Cut out 5 strips and sewed them together at the ends.  Ironed the seams, folded the strip in half and loosely stitched it around cotton cording to make the burlap piping.  


Then, centered the heart on the pillow and sewed this lovely bunch of flowers onto the pink burlap pillow square, making sure to stitch through each flower to keep any of these guys from falling off.  {Sorry no picture because I know you know how to do this}   Now I was ready to finally finish!  Yay and more yay!!!  Pinned the cording in between the two pillow squares {with their right sides facing - but, yet again, I know you know how this goes}   Stitched around the pillow, leaving 5 inches open to turn it right side out.  Yea, that's larger than you normally like but I wanted to be sure my rose filled heart survived the turning out!


And here is my newest baby ready to all grow up!

  All grown up!
Well, it's not quite what I envisioned, but close.  I originally was thinking pink and black.  Maybe next time.?
Wish the final picture did the pillow justice..  I hope to get better at this soon!  .


There's a fun party going on now through April 30th 
check it out!


The DIY Show Off

Now that I finally figured out how to link to the parties and put their link to my POST  and NOT just my blog, here they are in no particular order order:


Wednesday, January 26, 2011

Quick easy and healthy dinner!


This is what we threw together for dinner last night.  What a tasty wrap it was!


For each wrap we used:
Tumaro's Low Carb Garden Vegetable Tortilla
{and use as much or as little as you like of the following}
Roasted Chicken from Costco  - or any ready roasted chicken
1 Tbs Fage Fat Free Greek Yogurt {might be good with Fat Free Ranch dressing}
1 Tbs On the Border Salsa {or your favorite}
Lettuce
1/4 Cup Grated Mexican Cheese
You can certainly add other things like chopped tomatoes, onions, peppers, etc,  but this was all we had.


Layer however you like and roll it up!  Hope you enjoy.
There other options - add things to the Greek yogurt.  I think we will mix in a little ground red pepper or hot sauce next time.

Sunday, January 23, 2011

Black Burlap Heart Pillow

     So – this is what I made Saturday night.   


I started out ironing freezer paper onto muslin then printed my “happy hearts” onto the fabric.

Removed the freezer paper and ironed a piece of fabric fusion on the back of the muslin. 


  I sketched a heart around the message, determined the vertical center of the heart and folded along that line.  Then I cut out the heart.  Just like we all did in elementary school!  


Next, I made a 10” by 10” pattern out of posterboard I had on hand.  Used a little chalk to trace the pattern around the black burlap.  Then I cut those babies out


Loosely stitching the ric rac to one piece of the pillow was the biggest challenge for me.  This was a last minute decision and, as usual, the craft buzz adrenaline was going strong.  So, why plan ahead?  Next time, and there will be a next time, I will cut the size of the pillow so the ric rac will work well around the corners.  


Anyway, after I stitched the ribbon around the piece, I pinned the 2 pieces together and sewed all the way around, leaving a 2” opening.   Turned it right side out, ironed it, and eyeballed where to place the muslin heart.  {The tape measure was in another room and, remember, I wasn’t stopping for anything!!!}


 I removed the backing from the fabric fusion adhered to the heart.  Placed it on the pillow and ironed away!  Then I stuffed that cutie pie and stitched the opening closed.  I thought I would be finished here, but no….I had a few more ideas.  
I decided to loosely hand-stitch around the heart to give it a touch of shabbiness.  Then,  I happened to remember the red burlap rosettes I had made for my next pillow!  {Coming soon} Grabbed one and stitched it to this rascal.   There you go!  My new favorite pillow!


Check out this great party going on now through April 30th!

The DIY Show Off


Thursday, January 20, 2011

Love the Chicken Napoleon Avocado Sandwich


I happened upon a really interesting recipe by The Sweeter The Better     It's her post about the recipe Chicken Napoleon Avocado Sandwich.  Well, since I love some puff pastry with just about anything, I had to try this!


Just look at this and you will know what I am talking about!   Made it last night and - people - I am in LOVE with this.  Unfortunately, I love mayonaise {thanks Mom}  This mayo mixed with cayenne pepper is one of my favorite kicks.  Oh yea, already thinking bout the places I can go with other version of mayo with spices.  
This is one of my all time favorites!   Check It Out!  Let me know what you think.............

Wednesday, January 19, 2011

Something for Mom - Her new Ragdoll


Well, I finally got around to making a ragdoll for my Mom from her tattered and much beloved old sweatshirt.  This is made from all recycled  or, as I like to say re-purposed, items I already have.just laying around waiting for some action!   I even had supplies leftover to make her a pillow with her name. Moop on it.   That project is coming soon!  Ha!


That's my sweet 91 year old Mom in the middle and my wonderful Mother in law on the right.  I am so blessed!  My siblings and I just moved Mom to a memory care facility {and she is doing very well there }   When we moved her, I just couldn't throw out her favorite sweatshirt .  So I decided to make it into a ragdoll.
What I used:
My Mom’s old favorite worn out sweatshirt
Leftover felt scraps, yarn, and embroidery thread from previous projects
Old bed pillow's stuffing  {it had lost it’s shape and was not nice enough for
   donating anywhere!}
Old pillowcase from my daughter's freshman dorm room
And leftover poster board to make my pattern


I had lots of ideas in my head of how I wanted the doll to look.  And, I knew what Mom liked in her ragdolls.  Tough decision but I had to pick one and go with it!  I knew I wanted to make it simple.
I drew a pattern on the poster board, cut it out, then traced it onto the inside of her sweatshirt.  {I had turned the sweatshirt inside out and pinned it so that I could cut both pieces at the same time}  Okay - Time to get it done!

Ironed on fabric fusion to the back of blue felt (eyes) and pink felt (lips) 
Simply cut out dime sized dots from the blue felt for the eyes.  My Mom has the prettiest blue eyes!   Then, I drew a lip design on the pink felt and cut it out.  Ironed those babies on the doll face.  Simple as that!  I did decide to handstitch around eyes and mouth just in case.
 Wrapped the pink yarn 30 times around a large Nutella jar -  It was the closest thing at hand.- and cut each end to create the stringy hair.  I placed the  yarn around the head where I wanted the hair to be, then taped ends {so they would not get in my way when I sewed the pieces.}


Here she is all sewn up and stuffed!
And here is my 91 year old Mom hugging and showing off her baby to her friends  She loved it.  I'm so glad  {We tell Mom she is 89 - Sorta like the new 29 }  Like all of us - whatever rocks your boat


Note-I gave this baby Mom calls Katie, a little crooked smile just because I know that's what she loves.  Things not perfect    One Happy Ending here!

 Another FYI  She has collected so many amazing things from tractor seats to Raggedy Ann and Andy dolls {last count was over 100}  Go Moop!


DebbieDoos - DebbieDoos Newbie Party
At the Picket Fence - Inspiration Friday

Sunday, January 16, 2011

Real Easy Black Bean Chicken Chili

I know by now you are thinking that all we eat around here is chili!  Well, yes,  we do eat a lot, but it's just that lately we have been trying new versions.  The Black Bean Chicken Chili we made last night goes straight to the top of our list.  Great flavor and didn't feel so heavy.  


We adapted this recipe found at My Recipesone of our favorite go to sites.
This scrumptious baby takes around 10 minutes to throw together, and 20 to cook.  Not too shabby, huh?
Hope you try this.  And, for now,  I promise to lay off the chili posts!


Thursday, January 13, 2011

Love the Guy Cooking Posts!

I like to change things up sometimes - actually I like to change stuff up a lot!  {Good for the brain}  It's fun to check out posts by guys.  Not that they do anything different but I really enjoy their perspective.   Just maybe they know how to cook bigtime!   Two of the ones I have recently discovered:
Jalapeno Popper Dip
Closet Cooking   You seriously need to check out his recipes - I'm making his Jalapeno Popper Dip first!  
Or maybe the Chicken Fajitas??? :)


Attifood   Talking about the Beer Can Chicken  My men in the fam love it - It's a guy thing and I don't complain when the guys cook!  Bring it on!!!!

I'll be looking around for more great guy cooking blogs because they know how to cook!-  Keep you posted

Monday, January 10, 2011

White Chicken Chili and Can Redo cHECK iT oUT!!!


As the snow began to fall here in central North Carolina today, my thought for dinner was CHILI!  A real favorite around the house, and we have tried numerous versions!  But one from our NC magazine, Our State,  that I spotted on their Facebook page today really got me going!  It's  from the 100 year anniversary recipe book from a Baptist church in Eastern North Carolina.  We made this White Chicken Chili tonight.  Awesome!  Seriously!!!

White Chili

Only change - we used a roasted chicken from, where else but COSTCO!  Makes my life easier!  And added White American cheese quesadillas for the side.  Perfect dish for a snowy night.  In my house, if everyone likes dinner, it's a HUGE hit!  We'll be making this baby again.  Try it - you will be oh so happy you did.
But wait - that's not all!  While the chili was simmering I washed one of the cans and just see what I did with it here.  Ha!


I had a big time late afternoon craft buzz going and this was so quick and easy.  Until the next one.....

Recycled Can from our Chicken Chili


Well - as our Chicken Chili for dinner was simmering, I really wanted to do some crafting.  I have a couple projects I hope to finish tommorow since we just might be snowed in here in Piedmont North Carolina.  :)
So I looked at the empty cans and the black burlap scraps I have from my other project.  This is how it went down!
Started with this stuff - washed can, black burlap, ribbon and Mod Podge.  {I'm starting to become a big fan}  

Cut some burlap to fit the can with extra at the top to fold over those rough edges.  As I said this was a sort of "impromptu" deal so I cheated and used the finished edge of the burlap at the bottom so I didn't have to fold it under, or do anything else, to have a finshed edge.  Then, I covered the can with Mod Podge and {OOPS} forgot to take a picture but you know what I'm talking about.

Wrapped it around the can and folded the end under - used  more Mod Podge for this.


Glued some ribbon around the can with the glue gun (I was out of my Liquid Stitch).  I really really wanted a bow on this and I tried,  I truly tried but as I have said before - I need real help with bow making.  Just isn't happening, so if you know of a great tutorial for me that would be awesome:)   I happened to have these wooden disks and a Sharpie so, as the chili was about to be served, I tried my hand at this monogram.  I apologize - this was thrown together in 20 minutes and could be so much more.  There are many possibilities here but the best is knowing this is one can that won't add to our landfill!  

Party links

Homemaker on a Dime-Creative Bloggers Party & Hop

TUESDAY
Coastal Charm - Nifty Thrifty Tuesdays
Today's Creative Blog - Get Your Craft On


Friday, January 7, 2011

Something for Mom

Okay - so I don't have a post yet, but... I'm thinking what I want to do next is something for my Mom (she's the small one in the middle  Can you believe she is 91?   FYI that's my beautiful mother in law on the right with Zoey   One amazing woman with one sweet puppy!   I am so always thankful for all my blessings  Moop is dealing with memory loss (maybe Alzheimer's but, the doctors are still deciding)  Anyway, we {my 3 sissies and one baby brother}had to make a tough decision and move her to a memory care facility and - how blessed we are for the one we found right here in our hometown!  A few tough days but she is doing very well there. They have been wonderful to our "queen mom"
She is an amazing painter just like my precious mother in law - started late in  life (her 60's) and BLOSSOMED!   We have tried for many years to get her back to her painting (because it's not only a great thing but it keeps her mind active)  So I'm very happy to know that she is engaged in her painting again


Well - back to my idea. She loves this worn out sweatshirt and she loves her ragdolls  so.... I am going to turn this comfy sweat into a  sweet doll she can hug and love    I'll keep you posted.
Making it soon - have all the stuff now - just need to find the time   PLUS I am using stuff I already have.  {I like to be green - since I was 17}  Yea it rhymes - Ha!  Anyway, her old sweatshirt,  the colorful pillowcase from my daughter's first dorm room, thread and embroidery thread and the stuffing from the old dorm pillow that is still good but not in any shape to be donated anywhere!   Hope she likes it  :)

Monday, January 3, 2011

Love some Chalkboard paint!

 One of my first chalkboard paint projects!


A little over a year ago I tried my hand at making my own chalkboard paint.  I found the recipe at  Martha Stewart   Why is it that some new ideas just send your head spinning?    Seriously,  what you can do with this is wide open and nothing was safe in MY house.  Ha!  Guess by now you know I love love love this stuff  {you can print it here}   Still thinking and dreaming about what I can do with this!  
Ok - I  tried both versions - the ready made and the recipe from Martha.    Hands down, making my own with this recipe was so much better.  Here is a picture of the grout with paint from a later project
More versatile and the color and texture were so superior to the ready made canned chalkboard paint.  Well, I buy flat latex paint in beautiful colors {Yea we have choices} !at any local home improvement  store ! {Lowe's, Home Depot}  in whatever color you desire for the moment....   Love pretty colors  :)   
If you want to make a smaller batch using one of the small paint bottles from the craft store try this.
FYI  Valentine's is just around the corner........

Fun parties!

LinkWithin

Related Posts Plugin for WordPress, Blogger...
Pin It button on image hover