Saturday, March 26, 2011

CHOCOLATE CHALKBOARD!


Late last night I was thinking of chalkboard paint again. :)  For a long time I’ve been really thinking about  brown chalkboard paint.  So it hit me – why not chocolate colored chalkboard?  Then I thought about Easter and Chocolate Bunnies!  But I don’t have access to a jigsaw {got to get one soon!} so I’m not able to cut out a wooden one for now.    Bummer!   Just as I was getting ready to call it a night I thought about my chalkboard tags!  They were made from cereal boxes and turned out really well.  I wrote myself a reminder {because sometimes I forget things} went to bed and finished off the box of cereal this morning for breakfast!   
You can see more chalkboard projects where I got my inspiration – Martha Stewart!  I had to adjust the recipe since I was not using a full cup {like I did for my Turquoise potion! That went on and on and on}

Here is what I used:
Cereal box
Colored Chalk
Burnt Umber Acrylic paint  {2 oz.}
Non-sanded Grout  {2-1/2 teaspoons}

Mixed  my potion: the non sanded grout with the burnt umber acrylic paint. Mix it well!
I cut the box down one side of one corner and opened it up.  Then I sketched a bunny out with chalk.  Cut my bunny out!

Since I tend to like to do more than one piece when I am using the paint, I decided this chocolate bunny needed something to nibble.   So I sketched a Hershey kiss shape and cut it out!


   So here they are with one coat of chocolate chalkboard paint!
And don't freak out if they buckle.  Because they will.  They will flatten out once these puppies are dry!  Trust me here.  
I usually paint 3 coats.  Once dry you need to cure it.  Take a piece of chalk and rub it sideways all over your creation!  Take a very slightly damp cloth {or paper towel like me!} and wipe it off.  I like to do this twice.   

Okay - my Chocolate Chalkboard Bunny is finished!  My bunny and the Hershey kiss are chilling on my daughter's wall.  {I would show more of her room but  - she needs to tidy up a bit!}  And I am having so much fun with the chalk. Thinking here I need some more colorful chalk!  Working on that next!  :)


Next up - One Ugly Brass Thingy. My Goodwill find for the day - $1.99.  It is going to be ORBed big time!  Meantime I am heading to the kitchen for some serious chocolate smack down!  Chocolate and milk !  {Life is Good}   Sweet dreams to all   :)   


I'm Loving These Parties! 

At the Picket Fence - Inspiration Friday
I Heart Naptime - Sundae Scoop
Tatertots & Jello- Weekend Wrap Up
French Country Cottage - Feathered Nest Fridays
Elements Interiors -  Whassup Wednesday
Fireflies and Jellybeans - Show Your Stuff
My Romantic Home- Show and Tell Friday  
DebbieDoos - DebbieDoos Newbie Party
Local fun for Kids and Smile Monsters - Fun for Kids Friday
Just a Girl - SAS Day
Tip Junkie at  Tip Me Tuesday
Super Stinky Boys at  Mad Skills Monday 
The Shabby Nest - Frugal Friday 
DIY Home Sweet Home Project -  More the Merrier Monday
Keeping it Simple - Motivate Me Monda
Under the Table and Dreaming - Sunday Showcase
Embellishing Life - Craft Catwalk
Skip to my Lou-Made by You Mondays
Paisley Passions - Thrilling Thursdays
Coastal Charm - Nifty Thrifty Tuesdays
Mommaskindacrafty   - Fantabulous Friday 

Friday, March 25, 2011

Pardon My Randomness!

Spray Painted Beer Box Totes

I love you all!  Anybody willing and able to follow my randomness!  Like I said - love yall!
Okay – I’m throwing another random post project out there.  I know you understand how it goes -  when you see something that you can use/reuse then why not?  Even the tiniest thing?   Well my family thinks I am a hoarder - I'm just trying to gently re-purpose stuff!   But, after you see my project  you will probably LOL, roll your eyes and think YEP she is!  She SO is!     Well - I probably am might be a hoarder who is way too sentimental about stuff.   Anyway – enough with this.  On to the newest random craft.  {cause there are many more posts my friends - hang tight!}  On a positive note I did just take 5 bags to Goodwill last week   Big step for me!  Totally cleared out one corner of my room. :)
On to the Random Post::

You know I love Costco.  So a friend told my husband about their Kirkland Beer sampler.  Said it was good stuff  and made right here in the USA.  SCORE!   Somewhere in Utica NY.   Well,  I’m not a beer drinker  but we did  buy a box of 24 that had four separate totes of six different varieties  {mathematically that means 24 bottles}  And the box itself was so sturdy.  That’s what caught MY attention as I was getting ready to put it in the recycling can.  It looked like something that I could really store hoard lots of stuff.  I'm really trying here.
So, I painted several coats on that sturdy box - because I'm looking for cheap ways seriously need to organize my stuff!  Left it outside to dry.  Went to sleep, woke up to a downpour.  RIP big beer box.  :(    So,  the box was done.  But the four plain white totes with no logos, etc on it were safe.inside the house.
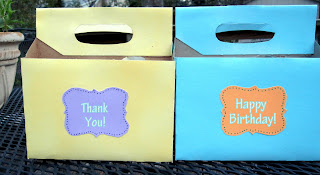
Here is how I started.  I painted the box on the left with Krylon Blue Ocean Breeze.  On the right is the box as it comes - all white!  But I know you can paint any beer or soda box.  That's because I have used cereal boxes for chalkboard tags  
 

Here are the spray paints I used.  The Blue Ocean Breeze along with Bright Idea {one of my favorite yellows} and Brilliant Silver.  I loved the silver but that little rascal was impossible to photo!  So I dropped him along the way.
Here they are all lined up looking like they are ready to DANCE!  Cha Cha Cha!  Pardon my old shower curtain that I use to paint things beside the driveway.  As you can see,  it is well used.  I like to think I am channeling Jackson Pollock here.  You will see it often in my paint projects :) And yea - I love Jackson Pollock!  Amazing artist!
 
They will play a big part in my hoping {trying} to organize my stuff.  Or maybe use them for packaging gifts?  Just don’t know how yet and still thinking this one through.   Any suggestions? 
They will most likely end up on a shelf – adorned with ribbons, bows, rosettes, burlap, polka dots, Sharpie mad art, felt flowers, and so on and so on………At least that is what could happen.

Now - today I took it a little farther.  Used some paint chips to cut out thingys to help embellish these guys.   As I mentioned,  the little silver guy is out for now.    Not to worry.  He'll be back one day.
Testing some options
And using Sharpies as we go along 
 This is where we stand now.    

 Just a few ideas for uses.  Storing supplies, serving water at a party, or use as a package for thank you gifts.   I'm using one now for my next project and storing the "magic ingredients" in it.  Yea - this is a pretty simple thing but it was fun to do.  Need to keep my mind active and this sort of stuff helps!  
Oh......Did I mention these guys can be flattened out?  Great for storage and traveling!
Have a great weekend!   And thanks so much for being here!  You are PRICELESS!

Linking to one fun Party!


Photobucket

Wednesday, March 16, 2011

ORB! Rusty Wrought Iron Chairs and Tables. Will it Happen?


Sooo,  I have been seeing lots of stuff painted with the infamous Rustoleum Oil Rubbed Bronze.  {ORB as some affectionately call it}  It is ALL OVER the place and I was very curious about why people absolutely adore this spray paint.  Looking at the many many blog projects posted using ORB, I just didn’t get it.  Wonderful, beautiful projects that I thought would be awesome in any color!  But it just seemed like ORB was everywhere!  Why ORB?  It was just really truly bugging me.   Well guys, I did what I had to do – I broke down today and bought a $7.97 can at Lowe’s Not cheap.  And, at the same time, I knew I needed a really good primer for the rusty rusty and more rusty project ahead.  Decided to try this Rustoleum Automobile Primer {for $3.77 at WalMart}  
So here is the deal!
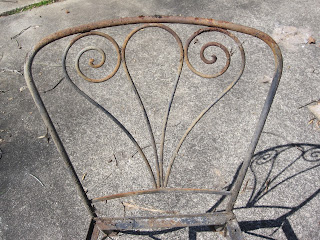
I had been thinking about what to do with the abandoned {under our deck} wrought iron rusty chairs with rotten seats the previous owners of our house were SO kind to leave behind.   SWEET!  All eight of them!  And there are a few tables too!  Here you see one specimen :)
 So, when I got home from buying the primer and spray paint I hopped out of the car,  went straight to a chair as I was shaking that ORB can and sprayed tested a small area on one chair. BAM!  Ohhh I love this stuff!   Couldn’t hold back {just had to be sure so sprayed again.}    Oh yea it's official {and how sick is it that I am in love with a spray paint? Ha!}  So now I know why people are crazy obsessed with  love ORB   Awesome paint and as I walk through my house I'm giving the eye to lots of things that just might get ORBed!  My hubby and monster puppy are {at the moment} quietly slinking their way to the "basement man cave"  Ha!  Like they are safe there. :)  Ok back to the chairs
I had to strop myself because I wanted to have a before and after picture.   
Well what do you know - I did remember to take pictures!   On the left you can see where the chair had been sanded and the Automotive Primer was applied  Then I sprayed the popular ORB on the primed chair you see on the right   It only took one coat of the primer and one coat of the {expensive} ORB to cover the chairs  {Just a few touch up sprays where I missed}  This is the stuff that makes me smile! See what happens next.......
In a pinch I had to Duct tape {another great invention} two cardboard pieces together to create a pattern for the seat.  Made sure it fit.
Then I traced that onto my 1/4 inch plywood board twice for the two chair seats.  This is my first project using a table saw!  First time ever!  So pumped and already new ideas... See - not too bad a job - it fits!  
Next up I will be choosing an outdoor fabric and finishing the seat.  Hope to finish this project by Friday when my baby girl comes home for the weekend.  


Okay, update here - today is Friday {at 5} and I haven't quite finished.  But I did remember some outdoor fabric I bought a few years ago for a project that just didn't happen. I think it will look good on the chairs.  So, next problem is how to waterproof the wooden base?  I have been reading up on this and it doesn't sound like it can be 100%.  I do have foam that resists mildew {along with the outdoor fabric} so that's a plus. :)  Well, then I thought about using a shower curtain as a layer under the fabric.  Then spraying some Minwax Indoor/Outdoor Helmsman Spar Urethane for some added protection.  And that is what I did!  
Here's hoping!  And quite honestly, to be realistic - this is for a college house.  These girls are pretty savvy but I don't want them to have to worry about the "cushions on the patio".  {Like they would}   So if the cushions last a year or two we are good.   Here is the fabric, the shower curtain, the foam {thanks Hobby Lobby for your 40% coupon}, and my trusty little heavy duty stapler that will pull this act together!  
Next up I traced the board onto my 17 x 15 x 2 smart foam.  
Cut it out with scissors and placed it on top of the wood base.  
Then – shame on me – no picture of the next step.  {I thought I did} But basically, I cut my outdoor fabric piece (18” by 48”) into two pieces and cut the shower curtain pieces just a wee bit smaller.  


Put the fabric face down on the table, then the shower curtain on top of that, then foam and topped it off with the wood base.
Well, another minor detour :)  The heavy duty stapler wasn't heavy duty enough.  So I grabbed what thumbtacks I had and used those.  Running out of time here – she had to leave by 3:00!   Not easy using the tacks so, at that point, I was going with whatever it takes to get it done!   
As you can see, it is not a neat job, but that’s okay.  These college kids are not going to be looking under the seats and checking out how I finished them off.  {I hope}   Surely they have parties better things to do!
See - can't even tell!
And whew, finally finished!  Now I only have at least two more to do plus the table!  
But that will be another week.!  Hope she and her roomie enjoy these because they have a cute tiny patio with nothing there.  So, this is a start!   
The chairs are "en route" and baby girl promises to send pix from her patio.  I will be sure to post those soon
Meantime.....
Here's is what I am using one of the rusty chairs for until I redo it!  Also, you can see my sweet monster puppy Jack that chewed up my wooden Angel and my daughter's UGG                                                           slipper trying to eat the plant.  

Good thing you are so sweet Jack!  {And the plant is not dangerous}

AND HERE IS MY NEWEST POST.  I LOVE PARASOLS!
spray paint party
Linking to these amazing parties!
I Heart NaptimeSundae Scoop
Thrifty Decor Chick - Spray Paint Party
French Country Cottage - Feathered Nest Friday 
Whassup Wednesday at Elements Interiors 
At the Picket Fence  - Inspiration Friday  
Fingerprints on the Fridge - Feature yourself Friday
Strut Your Stuff Thursday at Somewhat Simple 
Sassy Sites - Trash to Treasure
Blue Cricket Design Show and Tell Wednesday 
Debbie Doos - Color My World Party  
 Beneath My Heart - Best DIY Projects of the Month
Fingerprints on the Fridge-Feature Yourself Friday
Under the Table and Dreaming - Sunday Showcase Party 

Monday, March 14, 2011

Chalkboard Paint on Glass


So, I am amazed that the one cup of Turquoise Chalkboard paint I used for previous projects is still happening!  It all started with my post earlier this month.  All in all, I have made six projects with this 8 oz. bottle of paint and a bit of unsanded tile grout.   I made two more things and still have more left.  Ha! Here’s hoping you aren’t tired of this yet because here it comes!   Once again, here is the link to Martha Stewart where I found the magic Chalkboard potion!


I used a wine glass and a recycled jar here.  Painted the top of the jar with my favorite Krylon Bright Idea yellow gloss.  Using masking tape {I will use painter’s tape next time because when you let a wine glass sit around for several months with masking tape it gets a little gummy.  Duh.}  I  framed a square place to paint . And whoa!  big faux pas here - real big mistake.  I know there is a picture of these taped but in my frenzy to free up memory space on my camera they must have been deleted :(    Wish I had a picture but I know you know what I am talking about.   You are some of the smartest and talented people I know!   Please accept my apologies!  I'm learning every day.

Okay - back to the post.  It took several layers of paint and next time I will prepare the glass with  a surface conditioner to make it easier. {But it’s not necessary.  I just had to paint extra coats and be patient.  :( }   Rubbed a piece of chalk on its side all over the painted area and wiped it off to cure it.    


They are ready to go!  I filled the jar with my daughter’s favorite Easter candy, Robin’s Eggs.  {Well one of her many favorites and that is another story for another day!}


I also redid {yea I did} my 1 x 2 foot Chalkboard.  Added a starfish for a little more “beachy”  look.   Always changing always dreaming!  And join me for a walk on the beach  


Saturday, March 12, 2011

Yogurt Container into a Moss Planter


It’s Saturday!  And the first one in a good while that I have a chance to create some stuff.   I keep buying and thinking and planning and buying more stuff with even more ideas {but keep getting interrupted - grrrr}  I WILL get at least one project finished today!   {Another of my challenges to ME!}  
Live Moss Letters
Okay, so I keep seeing all these adorable letters covered in moss.on several blogs.  So cute!  It reminds me of several  moss projects I have done in the past.  Sooooo, today, I am going to recreate one of these projects.  Since I have a habit of rolling one project {and it’s ingredients} into more there is no telling what is gonna happen today!   {Check out my next post using more of  my cup of  Turquoise Chalkboard paint. – my third post and there is still paint left! Amazing!}


Well, back to business!  I am using a recycled Fage 0% Greek Yogurt  35.3 ounce container {Costco, where else?  We use lots of this in lots of ways - I will post that soon!}   It's good healthy stuff!


Bought 2 bags of floral moss at Walmart  {$2 each}  This is basically moss rolled up in a ball.  So, before you begin, unroll the moss and separate the better pieces from the not so great.   In this photo, the roll is on the lower right and you can see where I have unrolled the moss on the left.  


With a small knife I cut a few holes in the bottom of the container for drainage.  Sorry - There is a picture of this somewhere.    (And kids, if you are making this please let Mom, Dad, Grandparents or any adult do this for you! )
From the bottom up, with a glue gun I glued small sections of the moss all over that yogurt container!I held my glue gun about 1/2 inch from the container and sort of drizzled glue over a 2 x 2 inch area, then gently patted a piece of moss on that section,   Keep gluing until it is all covered up.  Not so sure why I went from the "bottom up" but it worked for me.  And if you want to try this with kids I think Mod Podge would work even better!


I overlapped the top edges to hide the fact that it is a plastic container  {Not that it is a bad thing}


Put a small layer of rocks {or whatever you want to use for drainage}  I used some of the sea glass I had from another project in place of the rocks.

Add potting soil and one pretty flowering plant - Project Done!  


Check out where I'm linking!  :) Because they are totally inspirational

At the Picket Fence - Inspiration Friday
I Heart Naptime - Sundae Scoop
Tatertots & Jello- Weekend Wrap Up
French Country Cottage - Feathered Nest Fridays
Elements Interiors -  Whassup Wednesday
Fireflies and Jellybeans - Show Your Stuff
Tip Junkie at  Tip Me Tuesday
Super Stinky Boys at  Mad Skills Monday
DIY Home Sweet Home Project -  More the Merrier Monday
Keeping it Simple - Motivate Me Monday
Embellishing Life - Craft Catwalk
Skip to my Lou-Made by You Mondays
Coastal Charm - Nifty Thrifty Tuesdays
Mommaskindacrafty   - Fantabulous Friday 
Local fun for Kids and Smile Monsters - Fun for Kids Friday 
The Lettered Cottage - How To's Day 
Simply Cadence - Make it for Less Mondays


LinkWithin

Related Posts Plugin for WordPress, Blogger...
Pin It button on image hover