Tuesday, February 22, 2011

Jack - my sweet Destructive Puppy

Jack update.  As long as I keep him supplied with fresh tennis balls he is good.    He is finally (at 1 - 1/2 years not chewing everything in site.)  
Jack- the sweetest most destructive pet in my life
and oh how I love him :)
Throughout my life I have always had dog{s}  Love them each and every one. But never ever have I ever had a dog like this one. My precious pup can't stand not having something in his mouth (it's the retriever in him) and he is always ready to CHEW!   He has chewed through chair rungs (just look to the right ) , molding, and his last deal was chewing up my Dollar Tree reading glasses.  Thankfully, he doesn't EAT things - he just DESTROYS them.   I have to be so careful to keep everything but his chew toys and tennis balls out of his reach!  It's like having a toddler again.  But I don't mind because he is also one of the sweetest pets I have ever had. 
Here is helping me with my knitting   
Seriously, I left the den for a minute and he snagged  what I had just started knitting.  Caught him red handed!  Look at that face he's thinking - "wuh oh busted!  And I was just starting to have a little fun with this knitting stuff."
Here he is saying sorry.  I didn't mean to pull the numbers off Dad's Blackberry. Luckily we found them.  Still had to get a new phone.
And here he is sleeping by my feet while I work on my blog.  
Priceless!

Fun Pet Linkys

Debbie Doos - Lucy's Pet Party
Funky Junk Interiors - Pets in Your Home

Sunday, February 20, 2011

Dollar Tree Planter Redo!

Ok - I was wandering around the Dollar Tree looking for V Day stuff for my family. {found a few things}  and like all you guys I'm always keeping an eye out for something new I could TRANSFORM!   Plus, I am so totally ready for SPRING!!!!   It's coming!   Well, I was limited on time and this little planter caught my eye.  Here it is with what I intended to use.  But life takes lots of detours!  


My youngest child’s tie dyed t-shirt that all the kids in her class made and had to wear on a huge field trip so the teachers could keep a closer eye on those rascals.  Sprayed the planter with Valspar Exotic Sea Gloss.

Cut the shirt into strips, stretched them out to make loops {shown in picture}  tied them around the planter at the top and pinned the rustic star pin where the loops came together.  Well – I really really did NOT like this and will not offend you with a picture.  And good thing I didn't like it because my monster jaw {precious} puppy chewed it up!  I was so relieved to find the star pin - and to know he did't eat it!  He is another story for another day...


Anyway, getting late, and ready to be finished, I grabbed a can of my Krylon Fusion Blue Hyacinth and sprayed that sweetie again!   Used a strip of scrap burlap around the top to make a simple bow.  I added a red star button just because I felt like it but I just might like it better plain.  Put what’s left of my shamrock into this and I’m done! 


Another really tiny project.  It’s okay (I’ll keep it) but maybe it will trigger some new great idea for YOU!   Thanks for checking this out!


FYI  This is my personal assistant Jack.  Left my knitting for a second and he decided he wanted to help!  Good thing he's sweet......


Saturday, February 19, 2011

Hey Jute!

Bought some Jute webbing a few weeks ago and have all sorts of ideas….  You know what I’m talking about when I say my mind is in OVERDRIVE here!   Yep, it’s spinning and I just have to step back, breath, and pick a project.  You know this is not an easy thing for me to do.  But, again, I am challenging Me to decide on something and go with it!  


Thinking, always thinking about what I am gonna use- here it is {for now}  Could change at any moment - detours are not such a bad thing and we are open for suggestions!  Actually, I would love to hear any and all of your ideas!  Thinking pillow, container, frame, so on and so on  I would love to hear your ideas!!!   Let me know your ideas!  They are always awesome    As for the project .....stay tuned................  Night guys


Hint - the embroidery thread is there for a reason.  But you all ready knew that !   Ha!


Wednesday, February 16, 2011

My Sweet Sunshine Clock

 
Have you ever been somewhere, anywhere, just kind of browsing – like I was in Goodwill this week   And, something catches your eye?  You look at it, pick it up, think about it, look at the price, turn it around, look at the price again, and think “maybe?”  Put it back on the shelf, walk to the next aisle and a few more – but go back and look at it again?  Is there some sort of magnetic pull some of even the tiniest items have for us?  This little $2 Elgin wooden battery operated clock {with no battery} just made me want to pick it up again.   So I did and carried it around with me just in case {and to keep anyone else from snagging it}  I brought this cutie home.  Didn’t know if it would work or not but just needed   wanted this cute thing. {And I was only out a Grand Total of $2.00 if it didn’t work – a chance I could afford for now….}  Well, I put a battery in it (not correctly) and it didn’t work.  I thought, ok, I can still do something here.  But, not one to give up, I tried the battery again and it worked!  That cute little second hand started moving.. {Sweeeet}  I just love my new $2 tiny clock.  Sometimes   Almost always the tiniest things bring us the most joy!   And more joy to come when I paint, paper, Mod Podge, or whatever to make it the cutest little clock ever!   I think I will call it my Sunshine Clock. 
And this is how it went down………

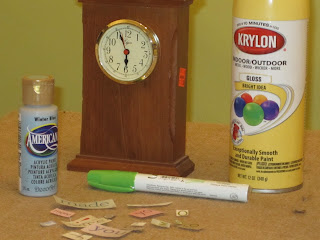
Started with this stuff but ended up only using my favorite Krylon Yellow spray paint - Bright Idea Gloss, and the letters cut out of magazines.  (I did use flat white Krylon spray as a primer since I couldn't find my primer.  It's around here somewhere....)


Once finished painting I put a layer of Mod Podge Gloss and pasted the letters to my Sunshine Clock. Covered it with Mod Podge for 3 more layers.
Sorry - the colors and photos are inconsistent.  I'm working on that! This $2 item that pulled me in had a message for me and this is what I heard….


This is my new little sweetie that I just had to  buy and don't know why - and she is giving back!  We all need to make more time for ourselves.  Hope you will!  What a cute reminder.


{Afterthought - the little Princess hair comb Tiara was 25 cents at Party City.  I'm using one on another cheap quicko project coming soon!)


Linking to these wonderful parties


Now that I finally figured out how to link to the parties and put their link to my POST  and NOT just my blog, which is a PERMANENT post on my side bar  Here they are in no particular  order:

Thank you Party hosts and thanks for being patient with newbies!  Sometimes we don't know what we are doing but we are trying!  

Chalkboard Tags made from Cereal Boxes


I love creating things with Chalkboard paint!  Like I told you all before, I really prefer to pick out good satin latex colors and mix it with unsanded tile grout.  I just think it gives you choices  for prettier colors. The proportions I use are 1/ 2 cup paint to 1 Tablespoon grout.   However, I had some premade purple chalkboard paint leftover   {Not my favorite but I didn’t want to toss it!  Not a good thing to do. }  I just used it.  Not bad.   And since we all love to repurpose stuff, I used cereal boxes for these tags.   Cut out hearts, painted about 3 coats on them.  {They will buckle up and try a yoga pose as you can see in this picture, but not to worry!  Once they dry they flatten back out.  Sweet! }
When dry, rub a piece of chalk – on its side – all over your cute heart tag and rub it off.  I did this twice.  Then write on it, punch a hole in it, slap some twine or ribbon on it and you are done!  And as for anything - the sky
and your imagination are your only limits!  Reach for the stars   Always!
Linking with: 

Check out this great party going on now through April 30th!


Tuesday, February 15, 2011

Party Links! Help us new bloggers understand


Well, duh, I just realized that when you link to a party and need to post their button, or re-link to them, you need to figure out how to place it on your POST, not your blog sidebar.  I have been putting their links and buttons on my  {PERMANENT}  sidebar   (Well - actually,   wouldn't a permanent link on your blog sidebar be a better way to go - after all, it is ALWAYS there for EACH and EVERY post!}  So much easier for new bloggers to understand.  But I hope the blog hosting parties will  help the us new guys learn how to do this.  {because we need -at least I need all the help we  I can get!}  Just betting you will get a lot more links that you SO rightfully deserve   You are AMAZING  and so unbelievably kind to host these parties for all of us  Thank you!  Just make sure it's clear how to link for us   I am starting to do this now, but probably still doing it so totally wrong.   Continuing to learn..... and usually wrong...HA!


And hope to have a new post of a few projects tomorrow!  Night to all


Now that I finally figured out how to link to the parties and put their link to my POST  and NOT just my blog, here they are in no particular  order:

I'm so sorry that I didn't do this right and am extremely  thankful for your patience.  Thank you - you are the best! 
  Please be patient with new bloggers - they are your biggest fans but just may not know what they are doing.  

Saturday, February 12, 2011

Best Ever Chocolate Chip {Gluten Free} Cookies


Well....My 21 year old Baby Girl, Julz, is home for the weekend!   And my monster year old puppy Jack is so happy.   He loves Julz   Well, it's Saturday night and we are chilling!  She just made the most amazing Chocolate Chip Cookies that are Gluten Free. {Yep – that’s what I said people – GF!} I'm not telling a story when I say they have to be one of my favorites - EVER!   You don’t have to be restricted to a Gluten Free diet to enjoy these sweet things!  Well it just might be because there's a whole lot of brown sugar and butter here :)   I said Brown SHUGA!

Then changed it up a bit here {in red}
·  3/4 cup butter, softened
·  1 1/4 cups packed brown sugar
·  1/4 cup white sugar
·  1 teaspoon gluten-free vanilla extract
·  1/4 cup egg substitute    {Changed to 1/ 4 Cup Egg Whites}
·  2 1/4 cups gluten-free baking mix  {We used Bob's Red Mill All Purpose Flour}
·  1 teaspoon baking soda
·  1 teaspoon baking powder
·  1 teaspoon salt
·  12 ounces semisweet chocolate chips  {Milk Chocolate Chips – by Ghiradelli!  Can’t get enough of their chocolate!}

  1. Preheat oven to 375 degrees F ( 190 degrees C). Prepare a greased baking sheet.
  2. In a medium bowl, cream butter and sugar. Gradually add replacer eggs and vanilla while mixing. Sift together gluten- free flour mix, baking soda, baking powder, and salt. Stir into the butter mixture until blended. Finally, stir in the chocolate chips.
  3. Using a teaspoon, drop cookies 2 inches apart on prepared baking sheet. Bake in preheated oven for 6 to 8 minutes or until light brown. Let cookies cool on baking sheet for 2 minutes before removing to wire racks.    
  4.  My Baking Girls!  They bake when they aren't golfing!    Or golf when they aren't baking???         
  5.                                                   
  6.   


Painted Crosses


Michaels has $1 wooden crosses.  Pictured here see the way it comes au naturel, two that I spray painted several colors on - yellow and lavender - to give them a distressed look and one that I glued Sea Glass all over! Simpleness…  { Not the best job but I did it quick!}  I bet you know how to distress but if you don’t please email me or Google it!  There are amazing tutorials out there   I tried the sea glass after a good friend gave one to my daughter for Graduation.  Her mother made them for her church fundraiser.  I tried it in blue shown here far right.  .
I give these to the wonderful people in my life that need blessings and are going through rough patches in their lives.  They would be lovely with some inspirational words painted, stamped or even Sharpied! 

Twirly Girly Ring


This is something I made for my youngest daughter {I actually made this one morning while my coffee was brewing!  Ha!}  

I gave it to my baby girl {Ok - she is 21 now but will never escape being MY baby girl}  She actually liked it {{faint}} and her friends did too!  {{faint again}} That really makes my day when the kids WANT me to make them something.  A true rare occasion!
Start with any stringing wire, any color.  I used 12 gauge aluminum for this.  {Cause it’s what I had }  Sorry, but I didn’t measure the length of the piece I made.  Guessing it's cause I just woke up and was waiting for my coffee?
I started out wrapping 2 times around my finger.  Using my pliers I bent the end I started with at an angle so that I could hook it together where I wanted to start.  Then I simply kept twirling around until I reached the size wire rosette I wanted.  Then cut it, tucked the end under and up into the twirl to keep it smooth to the touch!  DONE!

Tuna Can Organizer


My Tuna Can Organizer!


Clean and clean the tuna cans.  Get rid of tuna smell.  We don’t eat a lot of tuna but these cans cut well with smooth edges so you don’t have to worry about nasty cuts!  Measure the depth of your can - usually little over an inch- and cut a strip long enough to cover that precious thing!


You could let your kids doodle all over paper and embellish to their hearts content!  Or, pull out your favorite color Sharpie to embellish and/or randomly enjoy being a child again!  I used a deep pink Sharpie on dotted aqua paper I found in the dollar aisle of Target.  Just glued it on, then arranged the cans how I wanted them.  Glued those rascals to each other and – DONE!  You could glaze or Mod Podge over if you like. 

Four Quick and Easy Projects


Okay guys – As I have confessed before, I’m not good at cutting back or packing light so, a few days ago, I actually challenged myself.  Yea, I challenged ME to come up with 4 quick, easy, cheap, and SHORT – Yep I said short! useful projects.  Scary stuff for me  .But I believe I can do it! I think I can I think I can!  Though not big in scope I hope these tiny ones bring smiles to your faces.  After all, that’s what it’s all about – spreading Happiness!!!!!   I'll be honest - I did sorta have a posting block for a few days.  Now I'm ready!

First off  - tuna can organizer!


Clean and clean the tuna cans.  Get rid of tuna smell.  We don’t eat a lot of tuna but these cans cut well with smooth edges so you don’t have to worry about nasty cuts!  Measure the depth of your can - usually little over an inch- and cut a strip long enough to cover that precious thing!


You could let your kids doodle all over paper and embellish to their hearts content!  Or, pull out your favorite color Sharpie to embellish and/or randomly enjoy being a child again!  I used a deep pink Sharpie on dotted aqua paper I found in the dollar aisle of Target.  Just glued it on, then arranged the cans how I wanted them.  Glued those rascals to each other and – DONE!  You could glaze or Mod Podge over if you like. 

Next! One of my favorites and easiest! 


 Michaels has $1 wooden crosses.  Pictured here see the way it comes au naturel, two that I spray painted several colors on - yellow and lavender - to give them a distressed look and one that I glued Sea Glass all over! Simpleness…  { Not the best job but I did it quick!}  I bet you know how to distress but if you don’t please email me or Google it!  There are amazing tutorials out there   I tried the sea glass after a good friend gave one to my daughter for Graduation.  Her mother made them for her church fundraiser.  I tried it in blue shown here far right.  .
I give these to the wonderful people in my life that need blessings and are going through rough patches in their lives.  They would be lovely with some inspirational words painted, stamped or even Sharpied!  


Next is something I made for my youngest daughter {I actually made this one morning while my coffee was brewing!  Ha!}   

I gave it to my baby girl {Ok - she is 21 now but will never escape being MY baby girl}  She actually liked it {{faint}} and her friends did too!  {{faint again}} That really makes my day when the kids WANT me to make them something.  A true rare occasion!
Start with any stringing wire, any color.  I used 12 gauge aluminum for this.  {Cause it’s what I had }  Sorry, but I didn’t measure the length of the piece I made.  Guessing it's cause I just woke up and was waiting for my coffee?
I started out wrapping 2 times around my finger.  Using my pliers I bent the end I started with at an angle so that I could hook it together where I wanted to start.  Then I simply kept twirling around until I reached the size wire rosette I wanted.  Then cut it, tucked the end under and up into the twirl to keep it smooth to the touch!  DONE!


Easy thing #4!  Here we go people


I love creating things with Chalkboard paint!  Like I told you all before, I really prefer to pick out good satin latex colors and mix it with unsanded tile grout.  I just think it gives you choices  for prettier colors. The proportions I use are 1/ 2 cup paint to 1 Tablespoon grout.   However, I had some premade purple chalkboard paint leftover   {Not my favorite but I didn’t want to toss it!  Not a good thing to do. }  I just used it.  Not bad.   And since we all love to repurpose stuff, I used cereal boxes for these tags.   Cut out hearts, painted about 3 coats on them.  {They will buckle up and try a yoga pose as you can see in this picture, but not to worry!  Once they dry they flatten back out.  Sweet! }
When dry, rub a piece of chalk – on its side – all over your cute heart tag and rub it off.  I did this twice.  Then write on it, punch a hole in it, slap some twine or ribbon on it and you are done!  And as for anything - the sky and your imagination are your only limits!  Reach for the stars   Always!

And guess what dear friends.  Hehe..... I hope you aren’t tired of these mini quick projects because I have 2 more to share!  I told you I had a hard time cutting back!  Simple dollar deals that would be great to do with your kids. 
Always dreaming...............

Thursday, February 3, 2011

My Pink Story

My Pink Story 
{Color of the Year}

I grew up in an amazing family of 5 kids - 4 gals and one baby brother that got picked on and loved by us 4 gals.  
And yep - poor guy.  He was loved and tortured by us all!   
Cutest brother ever {don’t tell him I said that!}  Really cute and oh so special especially when he had his cape on!   {Heehee – he knows what I’m talking ‘bout!}  
Anyhow - my only problem was the color pink.  Back in the 60s days when I was a kid - brown eyed kid  {Yes - I'm sorta old but not really old yet} my younger sis and I usually got the same gifts except for the fact she always got the blue one and I got the stinking pink one.  It was all because she had these beautiful blue eyes and angel blond hair.  I had the brown eyes and the mousy brown hair that I have been dying ever since the 6th grade.  Don’t get me wrong – my sis is awesome!  But I liked blue and wanted the blue bathrobe, the blue fuzzy bedslippers, the blue diary, the blue ANYTHING.  Well - I sort of had a chip on my shoulder when it came to getting pink vs blue.  And one Christmas I actually switched the tags on our gifts because I was determined to get whatever it was in Blue!  Ha!  I got the blue ornate piggy bank……Still have it!  But – oh to my surprise, in a Grinchlike moment many years ago I finally discovered I really don't look good in blue!!!!!!!!!!!  Truly  and really - not my color at all.  I still love the color but love my pink!  And since Pink is COLOR OF THE YEAR    Heck Yea!   Life is sweeeet!

LinkWithin

Related Posts Plugin for WordPress, Blogger...
Pin It button on image hover