Friday, December 31, 2010

HAPPIEST NEW YEAR TO ALL!

You are all so amazing!  I know this blog is pretty new but to all of my viewers - in all your wonderful countries - I want to hear from you!  I only hope each and everyone of you know how special you are!   2011 is our year - Blessings to all!


Wishing you and those you love one of the most Blessed New Years Ever!   

Thursday, December 30, 2010

Better Half of the Ceiling Tile a la Burlap Board!!


Okay - I have some adrenalin going tonight.  And so excited to report that I have actually finished another one of my many, many  projects.  My kids will be proud - Ha!  They roll their eyes every time they like something and I tell them I CAN MAKE THAT.  And that gives me even more ideas for posts.  But, seriously, I have a problem with too many  ideas and not enough time.   Bet you know what I'm talking about.....
Here we go!   What I did with the other half of the acoustic ceiling tile that became my Christmas Card display!
And here is the road we took to get to this board!
Like the other board, I measured the burlap an inch (or 3/4") larger than the actual board itself.
Then cut the burlap 

As I mentioned before in my earlier post Red Burlap Bulletin Board 
I like to paint the white tiles a color similar to the color of the burlap (because it has such an open weave and I don't like all that white showing-just a personal preference).  And anytime I can use one of my fav Krylon colors, Caramel Latte, I use it!  What is it about colors that make such a difference in our lives?
.
Anyway - back to the board!   I folded over the edges just like the red one, but with a different twist.  Instead of staples I used upholstery tacks.  As you can see in the picture I tried to place them every 2 inches.  Not the neatest job, but hey - it is my first attempt!  I do really like the studs with the burlap.  Actually LOVE this combo!
The corners are a bit tricky but if you trim the edge at an angle and treat it like you do gift wrapping a package you can make it happen
Then add some of the same flower tacks used before - wonderful!  Cool note-you can switch this and any other board up with different tacks!  

Check out this fun party going on now through April 30th!


The DIY Show Off

Pantone announces 2011 Color of the Year!

wow!

Okay - I know they announced it a few weeks ago but it is still exciting news!
Courageous. Confident. Vital. A brave new color, for a brave new world. Let the bold spirit of Honeysuckle infuse you, lift you and carry you through the year. It’s a color for every day – with nothing “everyday” about it.
I don't know about you but I WANT THIS COLOR in my LIFE!  Clothes, room color, appliances, garden, and whatever the heck I can do with honeysuckle!   This color will make me happy :)   
And yum!...Cookie and cupcake icing?   Thank you Pantone!   I mean, I love Turquoise too (2010 color) - don't get me wrong.  But oh the fun I can have with this color!   Get  ready!  Life will be rosier in 2011.

Lots of new ideas with this color!  And I already have Chalkpaint that I made in this color last year!  You know I love chalkpaint.  Here I go again!  Oh yea - I'll be getting messy with some honeysuckle projects!  Posting soon!


Oh Yea - It's Buffalo Chicken Soup Time


Love this Buffalo Chicken Soup - and made it Gluten Free!

Buffalo Chicken Soup


Yes Maam! We loved our Buffalo Chicken Dip  for the best party ever the other night!  So when we found this recipe at Better Homes and Garden  we were so so HAPPY!   And it did not disappoint.  Of course, as usual, we have to tweak things.- that's part of life as I tell my kids.  Take something, tweak it and make it your own!  We tweaked this in that we used gluten free all purpose flour (for my baby girl)  And left out the Bleu cheese because my kids might not like it.  Put a little lowfat Ranch dressing instead


Print this amazing recipe!

ingredients

  • 1  2-1/4 to 2-1/2 lb.  deli-roasted chicken, skinned, boned, and coarsely shredded
  • 2  Tbsp.  butter
  • 1/2  cup  coarsely chopped celery
  • 1/2  cup  chopped onion
  • 2  14-oz. cans  reduced-sodium chicken broth
  • 1-1/2  cups  milk
  • 1  tsp.  bottled hot pepper sauce
  • 1-1/2  cups  mozzarella cheese (6 oz.)
  • 1-1/4  cups  crumbled blue cheese (5 oz.)
  • 1/2  cup  shredded Parmesan cheese (2 oz.)
  • 1/3  cup  all-purpose flour
  •     Bottled hot pepper sauce (optional)

directions

1. In 4-quart Dutch oven melt butter over medium heat. Add celery and onion; cook and stir until onion is tender. Stir in broth, milk, and the 1 teaspoon hot pepper sauce.
2. In bowl toss together mozzarella, 1 cup of the blue cheese, Parmesan, and flour. Add gradually to soup, stirring after each addition just until melted. Stir in three-fourths of the shredded chicken; heat through. Top with remaining chicken, blue cheese, and hot sauce. Makes 6 servings.
Notes:  We subbed a little Ranch dressing for the Bleu cheese AND used gluten free all purpose flour (for our baby girl)   A tasty and filling soup here!  This will be on our list of "repeats"  Check it out - Great taste with little effort!

Monday, December 27, 2010

Yum! Chocolate Velvet Cake

My daughter, over at Bakeholic at Birth, made this amazing cake for our first ever Christmas Eve family dinner with just our immediate family.   Found it at Southern Living!   Growing up, my family celebrated on Christmas Eve.   For years we have always celebrated with my 3 sisters, baby brother,  and their extended families until this year.  Our families have grown in so many different directions (in a good way) that it was becoming tough to "orchestrate".  So, we had our own this year, and it was wonderful and magical and just pure special.  My husband and sons brined and smoked the turkey (and cleaned a little) while my daughters were busy cooking.  Does it get any better (or easier) than that?   What a gift that was for me - I didn't have to do much at all!  Just enjoyed!  :)  Best Christmas Eve ever. EVER!
The dinner was delicious and this cake was the highlight of the night!   It was absolutely wonderful.    And even better the second day.    Check this recipe out - you won't be sorry.  When I see chocolate, butter, brown sugar, cream cheese and pecans in any recipe I go for it!  
Print this awesome recipe!
Here is the Frosting

Friday, December 24, 2010

Thanks for all of you!

Thanks to anyone that takes the time to view my blog - Great things will be coming in 2011!  I wish that for all of you!

THE VERDICT IS IN! BUFFALO CHICKEN DIP


 Wonderful party tonight with my best and most wonderful friends and their children.  When I say "children" I mean kids ranging from 15 to 26 years old.  How awesome it is to see these precious little people pretty close to being grown up now (If any of us really grow up!  Not me!)  Seriously, I enjoyed talking to each and every one of them tonight.  They are some of the most amazing people I know and these kids WILL make the world a better place!   Wonderful, wonderful  young adults that I have had the privilege to know.  Keep it up kids!  (You know who you are)
Anyway - ran out of time and took one appetizer tonight.  The Buffalo Chicken Dip!
Buffalo Chicken Dip Recipe
Original recipe here from Taste of Home
     
·                                  2 (10 ounce) cans chunk chicken, drained
·                                 2 (8 ounce) packages cream cheese, softened
·                                 1 cup Ranch dressing
·                                 3/4 cup pepper sauce (such as Frank's Red Hot®)
·                                 1 1/2 cups shredded Cheddar cheese


    Our version (Thank you Kaki)   In place of canned chicken:
         
      2 packages (9 ounce) Perdue Oven Roasted Chicken Breasts (In the Deli aisle)
         (OR get a Costco roasted chicken)  instead of canned chicken - seriously? Canned chicken?  What were you thinking?   
      
       I am happy to report that the Buffalo Chicken Dip was a HUGE success.  We served it with Tostito Scoops and turns out the only reason any dip was left was because they ran out of chips!  Big favorite and we have a list of friends that want recipe emailed to them  Gotta warn you guys - it has a real kick to it :) Love it!    
      But don't forget to check out the guacamole recipe - not too shabby!  One of our favorites   We would have made it also - just got lazy   Actually not lazy - just busy
      And of course this dish has a way to go before it replaces my favorite baby - Creme de Menthe Oreo Fudge Pie

      Happy Holidays to All!


Wednesday, December 22, 2010

Party Tomorrow Night!


Okay - Our family will be going to one of our most favorite neighbor's home tomorrow night for a little Christmas "get together".   They always have the BEST parties ever!  And it's a family thing!  Our job is to bring an appetizer and I plan on bringing two!  Because appetizers are my favorite thing next to chocolate :)   No joke - I must have been a little bird in another life because I can't think of anything more wonderful than eating little bites ALL DAY LONG!  
Well on to the task at hand!  Here's the dilemma - we (my daughters and I) are NOT agreeing on which two dips to take.  Trying to choose between Beer Cheese Dip (Hubby's favorite minus the cheese and dip), Guacamole,  Buffalo Chicken Dip (Ummmm... my favorite, but what do I know?) and Ile de France Goat cheese with Roasted Red Pepper Jelly a la Costco!  I so heart you Costco!
Beer Dip Recipe
Here are the recipes:
Beer Cheese Dip from Taste of Home


Buffalo Chicken Dip also from Taste of Home  
Buffalo Chicken Dip Recipe


Guacamole from Allrecipes  


Recetas de Cocina Mexicana (Guacamole)


Or simply serve Goat cheese and Spicy Red Pepper Jelly  (Both at Costco baby!) over crackers.  That's one tough app to beat  


(sorry I don't have an image for the Roasted Red Pepper Jelly but it's another amazing treat at Costco)   


Well - with very little time, four kids, a house that's been neglected for a month, a tree half decorated, keeping a family business going, and last but not least a wonderful 10 month old "puppy" that's eaten a lot of our things like furniture and socks and did I mention one of my daughter's UGGs?   Yep  That was not a good thing.  I'll have more to say about Jack later.  If he weren't so darn cute..... Here he is trying to help me along with my knitting   Gotta love him.  (You can see what's left of the chair rung on the right)  


Check out these recipes and if any of you have a recommendation before tomorrow afternoon - please let me know.  Otherwise I will let you know what we choose and if it is a success or a dud!


Happy night to all - Hey did I see a full moon tonight?  

Sunday, December 19, 2010

Yea Baby - It's COLD OUTSIDE!

And this is just what the doctor ordered!
Chitpole Chocolate Chili
Well for those of us in the Southeast
[IMG_4486.JPG]
Just found another fab recipe at one of my favorite go to sites, Our Best Bites!   My daughters, 23 and soon to be 21, are becoming huge fans here.  ( More on them later)   We made this chili this weekend and what a treat it was!  Thank you for this amazing, wonderful, ever so scrumptious recipe.  Please do yourself a favor and check it out!   Love love love it!  This site is rapidly becoming dangerous to my waistline........

Thursday, December 16, 2010

Burlap Bulletin Board from Ceiling Tiles

This weekend was a busy one for me.  I have so many projects started that I need to finish!  I get started on one, then think of another.  Today I am making myself finish the burlap bulletin board I started a week ago. The materials I used are:
Acoustic ceiling tile 2 x 2, cut in half (Home Depot - around $3.00 for whole tile) I used one half for this project
Red satin interior paint
Black spray paint
Heavy duty stapler (not a staple gun although you could use one)
Red burlap fabric
Ribbon (to glue around edges for a finished look (I used black with white polka dots)
Optional - fabric to make flower push pins


I like to paint the front of the ceiling tile a color similar to the burlap color.  This isn't necessary but the burlap has such a loose weave that I don't want too much of the white tile showing through the fabric  I spray paint the back of the board with the black spray paint.  In the future I might use felt backing for a twist.


I trace the board onto the back of the fabric.  Then I add 3/4 to 1 inch around all four sides of the pattern. That way  I can fold the edge under and staple to the edge of the board.  (Unfortunately, my photo of this step did not make it to my computer - ugh)  As I've stated in a previous blog, you would never guess that my Dad was a professional photographer!   I fold over the edges and use the heavy duty stapler to connect the fabric to the ceiling tile.  Not the neatest job but, what can I say?   I get messy a lot!  No problem - it will be covered in ribbon!


This is the board after stapling all around!  Now - I'm ready to start finishing this!  I'm starting to believe I can do it!  


Then I used Liquid Stitch to glue the ribbon border around the tile.   Love the 50% off ribbon at Hobby Lobby!


Finished!  I added fabric flowers that I glued onto tacks.  I also tried wrapping the fabric around a push pin.  Both worked well.   I learned how to make these flowers at Our Best Bites.  Then I stapled ribbon on the back to hang this on the wall.  I really wanted to make a pretty bow but after several attempts I realized I'm not so hot at pretty bow making.  I'll be working on this at a later date.  Keep you posted!

Voila!  I finished my project.  It will be used as my Christmas Card display for now.  Next up - stay tuned!  I'll show you what I did with the other half of the ceiling tile.  


MERRY TO ALL!

Tuesday, December 14, 2010

CULINARY COVERS!

Gingerbread Woman
Lori's version
food-network-magazine-december-2010-340
Somehow, as I stumbled from one blog to another and so on and so on, I ran into Culinary Covers.  What a treat!   It's a fun blog dedicated to testing the recipes various publications have on their front covers.   I wish I had thought of that!   What is so interesting about this blog is how it's author, Lori Lange, actually makes the recipe from the feature item of publications ranging from magazines to cookbooks.  Most all of these are well known, from Food Network magazine, Cooking Light,  Vegetarian Times, California Sol Food, David Leibovitz with some Martha Stewart sprinkled into the mix. and many more! (Just to name a few)  I like the variety, but most of all,  I love love and love! her comments.  She gives an introduction for the recipe - maybe even a little history and lots photos of her version that she has made.  Then she has her "notes" about the creation.  And finally, Lori lets you know if it deserved the coveted front cover   Pure genius!  I really enjoyed this blog and went through every single yummy post!   
Once you check this out you need to visit her other blog,  Recipe Girl   It's a true treasure trove of 2,500 recipes.  Seriously good stuff!   I know you will have fun with this blog!
Thank you Lori!
Ready for DessertBanana Cake with Mocha Frosting

Sweettttt


Sunday, December 12, 2010

PEPPERMINT BARK POPCORN!

My oh my (as my mother used to say)  This is another fabulous recipe by Our Best Bites for Peppermint Bark Popcorn!   They have done it again!  Paired some amazing flavors together that are oh so good    Yum and yum again!   You definitely need to check out this tutorial. Sweet! And double sweet! 

This blog rocks!

CREATE YOUR OWN SUBWAY WORD ART

Wordle: MESSY

I stumbled upon a really cool sight called Wordle.  I am sure, by now, you have seen some amazing photos, cards, banners, signs, etc. some people call "Subway Art".  At this site you can create your own!  You can even choose fonts, colors and alter the layouts.  

Here are copies of ones I made in less than 5 minutes using my blog URL.   I think I'm going to have a lot of fun with this!


Sorry - the image quality isn't the best.  


GO WORDLE!                                               

Thursday, December 9, 2010

Make this Beautiful Living Succlent Wreath!


Traipsing through the blogosphere I discovered this wonderful wreath tutorial by Prudent Baby  The photographs are beautiful and the tutorial is so thorough that even I think I could do this!  What a treat this post is!  Please check it out!

Saturday, December 4, 2010

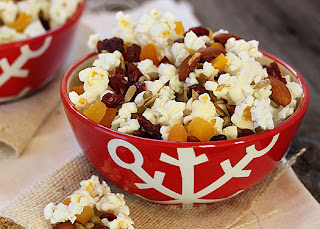
Popcorn Trail Mix

This is a great recipe I found at Good Life Eats for Trailmix with popcorn!  It's popcorn, nuts, seeds, and dried fruit!  Certainly healthier (and I think tastier) than popcorn loaded with butter! (Of course, you already knew that)   I can't wait to share this with my daughters who love this type of stuff!  Check out Popcorn Trail Mix if you are a popcorn fan.  And if you aren't then this might just turn you into one!

Friday, December 3, 2010

Peppermint Fudge Cupcake Jars!!!

Oh wow!  I found this wonderful and decadent Peppermint Fudge Cupcake Jars  recipe and tutorial at Our Best Bites.  Just tried baking it today and it is divine!  I think I could fall in love with almost every recipe on this blog!

Monday, November 29, 2010

Christmas Bead necklace


 More about the Christmas bead necklace posted in November
I found this fun post by FROO*GAL on how to make a cloth bead necklace.  She has great instructions on how to create one of these.  Check it out!  So, I thought I would try making this in Christmas fabric.  
What I used:
I chose 3 green and 2 red Christmas fabrics  
I cut out 2 rectangles (size 1-1/2 x 3" each) for each color plus one extra red one to make a    total of 6 green and 5 red covered pieces
Glue stick
20 mm wood beads with large hole (Like Froogal I found these at JoAnn Fabrics ($3.98 for 30)
Choice of ribbon (I used 1/4" wide)
Size 16 Tapestry needle (which I already had, but I think a slightly smaller one would work 
Toggle closure
Did not use an awl because I don't have one - but I do think it would help.
It's best to work on top of paper or wax paper when glueing the cloth to the bead.  I rub the glue stick all over the fabric swatch.  Then fold one edge over about 1/8" or less (Less worked better for me)
Place bead in middle with the holes facing out as pictured
I  wrap the fabric around the bead making sure the folded over edge overlaps the raw edge.   Then, I used the eye end of the Tapestry needle to work the ends into the holes.  This took a little practice so,  if you mess up,  just remove the fabric and try again.  But you end up with something like this:  Hopefully yours  looks lots better than mine!
Once all eleven beads are covered, it's time to thread the ribbon!  For a 20 inch necklace I cut a 30 inch piece of ribbon. but I came out shorter than I wanted so I will add extra just in case next time.  Thread the ribbon through the Tapestry needle and then thread the needle through the bead. I had to use needle nose pliers to get the needle and ribbon all the way through.  But this is where I think it would be easier if the needle were just a bit smaller.  I worked from one end of the strand to the other, but I imagine you could place the first bead in the middle and work out from there.  If you are working from one end, then place the first bead 7 inches from the end of the ribbon.  Tie a simple knot around each side of the bead, making sure you keep it close to the side of the bead.  Then thread another bead on the ribbon and make another knot.  Continue until all beads are on board the ribbon!
Then attach the Toggle clasp however you like.  I simply tied each end of the necklace to the Toggle clasp.  And there you have it - 
My first attempt!  There are lots of possibilities here...


Funky Junk's Saturday Nite Special Join us Saturdays at tatertotsandjello.com for
 the weekend wrap up party! Photobucket The DIY Show Off Thumbnail for 'Made By You Monday'     Photobucket  http://linda-coastalcharm.blogspot.com/Running With GlitterSYS Thurs Transformation ThursdayThe Shabby Nest Chic on a Shoestring Decorating French Country Cottage Designer Garden Button    Visit thecsiproject.com

LinkWithin

Related Posts Plugin for WordPress, Blogger...
Pin It button on image hover